Everything you need to know when making the Vivienne crochet lace top.

Whether it is working out the Hdc ribbing, the v stitch or making your first project in the round, hopefully you can achieve success with the Vivienne crochet top from reading up here.
In this post, I will show you how to:
- Make the hdc in the round
- Work front post and back post hdc.
- Join the V stitch in the round.
- Separate for armholes.
- Rejoin armholes.
Video tutorials for half double crochet and v stitch.
The first video I am going to show you is how to work the hdc rib. In case you didn't know already, Hdc means 'half double crochet'. It is the stitch that sits between the single crochet and the double crochet. I use US terms in my patterns so just make sure you know what terms you are using too!
Here you will see that I have chained a specified amount of stitches and will work one row flat before I join. This is something I do for knitting as well as crochet because it helps first timers avoid twisting and tangles! You can seam the piece at the end. We're only talking a centimetre at most so it really isn't much hassle.
I show you here how to work the hdc which is the following:
Yarn over, insert hook into the chain, yarn over and pull through. Yarn over and pull through all 3 loops on the hook. Ta da! That's a half double crochet stitch, and it is my favourite for very good reason:
It has all the bravado of the double crochet stitch with half the effort. If you are anything like me and you love to sail through a project, you will love the Hdc.
Moving on.
The front post and back post element that comes up next is slightly more complicated. In written form, it is really, really hard to try to get somebody to envision, so I have provided a video to support with that. This video below demonstrates how to get your waistband started.
The next video I am going to show you demonstrates how to join the V stitch to the hdc rib for the Vivienne crochet lace top. You may have seen the hdc rib already in my Jewel hat crochet pattern, but if not, I would recommend practising on a smaller item first. I have included a link to the Jewel hat here or you could make something slightly smaller like a cuff similar to what I have demonstrated in the video.
The Vivienne top is not the first pattern I have published that uses the V stitch. If you decide that you love the V stitch but want to make it on a smaller scale, try the Roma Cowl.
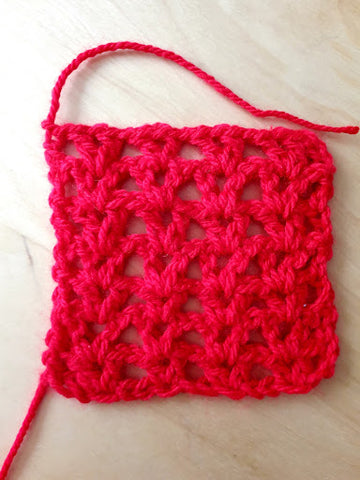
The V stitch is basically a variation of the double crochet stitch (I use US terms, remember?) with a chain in the middle. I'll explain here:
V stitch

Abbreviations: V st
V stitch is a crochet lace stitch. We create the vs by using double crochet and chains.
V stitch is comprised of a multiple of 3 chains plus an additional 4 chains.
First row (after chaining)
Make a dc (UK Tr) into the 5th chain from hook. Chain 1 and make a second Dc (UK tr) into the same stitch. Skip the next 2 chains and and make another V into the next stitch. Continue until you only have 2 chains left. Skip one chain and make a single dc into the next chain.
Second row: Make a 3 ch turning chain, make a V into the centre of the last V you made. This is called the chain space. Chain 1 and do the same again in every V across. When you get to the end, make a single Dc (UK Tr) into the last chain. Repeat for every following row.
V stitch in the round
This is slightly different. As we're not working flat, we don't need to leave 1 double crochet stitch at each alternating end of the row. Instead, what we do is chain 4 to mark the first leg of the next V and the centre chain. We then make another dc into the same chain to finish the v.
The video below will demonstrate how to do this:
Stay tuned for more tips coming on how to shape the front and back and how to join the sleeves! Let me know in the comments what you think of the V stitch.
I really hope that you enjoy making the Vivienne crochet lace top.

